Today I'm going to show you how to stitch an Italian knot.
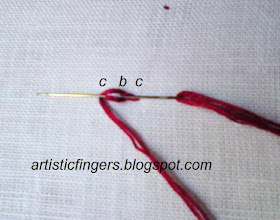
STEP 1 : Bring up the needle at 'a', go down at 'b', again bring it up at 'c' - a small running stitch is made.
STEP 2 : Pass the needle under the running stitch made in step 1.
STEP 3 : Pull the needle leaving a small loop.
STEP 4 : Pick up a small stitch by going down at 'b' and coming up at 'c'.
STEP 5 : Pull up the loop formed in step 3 as shown.
STEP 6 : Bring the thread under the needle.
STEP 7 : Now pull the needle , first knot is made .
STEP 8 : Take the needle down at 'd' which is approximately 2mm away from 'c', bring it up at 'e'
and pull the needle to make a running stitch.
STEP 9 : Pass the needle under the running stitch made in step 8.
STEP 10: Work step 3, then pick up a small stitch by going down at 'd' and coming up at 'e'
STEP 11: Pull up the loop and work step 6 again.
STEP 12: Work as of step 7, a second knot is made.
Repeat steps 8-12 .
I'd written about this knot in one of my earlier post.Hope y'all remember.
I learned this knot from my machine embroidery teacher Mrs.Rajeswari 20 years back. I was searching for this stitch in a dictionary/magazines etc for quite sometime now.But I couldn't find one.My teacher said she'd learnt this stitch from her sewing teacher when she was in fourth form/class.I don't have any proper reference for this stitch other than these little information which I'd noted down in my journal. This is the story behind my version of ITALIAN KNOT.
If any of you know this stitch by a different name,please do let me know.
I'd like to hear from y'all,so feel free to leave a comment.
Happy stitching,
Anita.


Interessante il tuo punto. Purtroppo non so scrivere inglese, lo capisco un poco . E' un certo periodo che ti seguo, da quando ti sei iscritta al nostro blog. spero che nel tuo ci sia la traduzione. Comunque, complimenti per tutte le tue creazione anche per i tuoi disegni.
ReplyDeleteLeila x Magia di un Ricamo
oh my God, is this how Italian knot works, I got some other idea from the web and i explained it in my blog.
ReplyDeleteThank u for sharing it with us Anita ji.
Hi Raji,
ReplyDeleteYour are welcome.Your version is also correct.As I said I don't have any reference for my version,except my teacher's instructions.That's why I'd written about the time frame.There must be a different name for this stitch,hope someone tells me.
Anitha urs look like cable chain stitch though u have worked it in different way...
ReplyDeleteI did lavangam work (we In Andhra call it S-knos) adding french knots..
If I'm not mistaken, I'd seen this stitch before but with a different name.Thanks for the tute-Ina
ReplyDeleteLakshmi-Thanks for the visit.It's not a cable chain stitch,I'm sure about that.When you work this stitch,you can see a diagonal line inside the oval shaped knot which will not be there in cable chain.Lavangam stitch is pistil stitch,isn't it?
ReplyDeleteIna-Please let me know when you remember the name.
ReplyDeleteIna thanks for correcting me..i tried and saw the difference.. i worked with cone thread and i just felt woww .. stitch looks beautiful..
ReplyDeleteComing to lavangam work I did four different lavangam works using pistil stitch, pearl knot, daisy stitch with tail and with s-knots..
After u mentioned diagonal line in between the oval shape i too remember somewhere in net i have seen. it is in black i mean it is printed, not worked with thread..if i find shall send for u..
Anitha, this stitch is called double knot stitch
ReplyDelete@Uma - No,it's not double knot.I'm sure about that.
ReplyDeleteIt's featured in Mary Thomas's Stitch dict as cable chain.
ReplyDelete@ Bhavani - No,It's not cable chain. I'm 100% sure about that.There is a slight difference between these two.
ReplyDeleteAntha few days back again i tried this stitch because i loved this stitch..the shape of the stitch come out so beautifully..yet to put in a project..if you dont mind small suggestion..why dont you put one new picture of the stitch so tht diagonal line seen clearly...though your tutorials are clear the diagonal lines are not visible so many think it is cable chain stitch
ReplyDeleteHi Anita,
ReplyDeleteThanks for the tutorial. I used it in my recent embroidery project.
http://nsangheetha.wordpress.com/2014/10/09/sling-bags-some-more/
I have used it for embroidering kolam(sikku kolam) design.
I loved the stitch and thanks for the tutorial.
Thanks,
Sangheetha.
Here is the pic
ReplyDeletehttps://www.flickr.com/photos/20966692@N08/15481486071