Showing posts with label Indian embroidery. Show all posts

Wednesday, 18 January 2017

lace,doily and shisha

A new embroidery project with mirrors and some basic stitches.                

Tatted lace in progress..                    

Crocheted doily with #20 thread..                   

Happy stitching!
Anita

Wednesday, 4 March 2015

black saree

I'd like to thank y'all for your e-mail wishes and comments on fb page.I'm doing good now..I was surrounded by smoke,cement dust,paints.. and my poor lungs couldn't take much :-(

I do wear saree but not often..I enjoy embellishing a saree though..                                      

The fabric is raw silk.I've used silk and stranded cotton threads.                            

To embroider a saree is not an easy task..got to cross some frustrating moments..repetition is not fun always..

Happy stitching!
Anita

Tuesday, 11 February 2014

Kantha embroidery and Sal FAQ

Kantha embroidery is one of the popular form of Indian embroidery techniques.It is widely practiced in West Bengal.Today it is also one of the popular techniques in Bangladesh which was a part of Bengal,India before the independence.I would say that kantha embroidery is one of the finest example of rich folk art.The kantha quilts were exported to Europe in large quantities during late 1500's - early 1600's.
The kantha embroidery has both Hindu and Muslim influence which is evident from the motifs used in this form.
                                                   
                                               
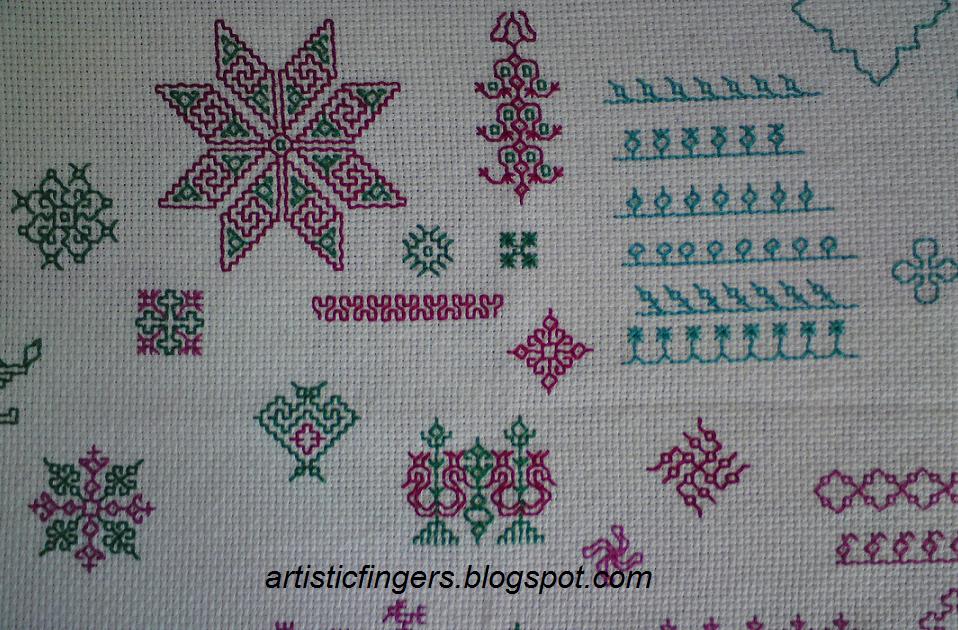
*The above image is a part of a pattern from my collection of a sampler worked by an unknown kantha embroiderer.

Kantha quilts called 'Lep' are made from old sarees. To make a 'leo' many sarees are laid together, running stitches with white thread are used to join and strengthen the sarees. The base fabric of the quilt is always a white saree (both cotton and silk) , decorative motifs are drawn and embroidered using black,red,green,yellow and blue threads.To get a rippled effect the entire quilt is covered by darning/running stitches with white threads.
                                              

Apart from quilts there are also other varieties of kantha. The most popular one is 'sujanis' which is a thin spread used during religious festivals and marriages.The mythological stories are depicted in these sujanis. Lord Krishna and the lotus dominates the sujanis. 'Rumal' kantha is a hand kerchief with a floral border and a corner motif. 'Bayton' kantha is a piece of embroidered cloth used to cover books. 'Arshalita' kantha is a narrow strip of embroidered cloth with broad borders used to hold accessories like mirrors,combs etc. 'Arshalita' kantha is an envelope shaped wallet .

The common motifs used in Kantha embroidery are lotus,fish,peacock,bull,tiger,pipal leaf,ship,snake,elephant.Also vines,flowers,human figures,geometric motifs are widely used.

Kantha Embroidery Sal FAQ
I have received few e-mails with some queries about this sal. I thought it would be better if I answer them here so that it'll be helpful for others with the same queries and also on a personal note it saves me some time.
  • To participate in this sal you have to sign up by either leaving a comment with your e-mail id or e-mail me at artisticfingers2012@gmail.com . If you'd already left a comment in the previous post with your e-mail id that's okay too.
  • You don't have to buy a kit or pattern from me to participate in this sal. It is totally free of cost.
  • I'll start sending the pattern via e-mail to all the participants this week end.
  • It's suitable for all level embroiderers.
  • You will need a close weave cotton or silk fabric,stranded cotton threads/embroidery floss,hoop or frame,mechanical pencil and light box if needed,scissors,crewel needles no.7 or 8.
  • Regarding the size of the fabric – you can decide it after you receive the pattern by yourself.
    I'll be making an iPad cover out of this project so I will be choosing a size that suits my iPad.
    But you could also stitch this on a pillow/cushion cover,dress,frame it,use it in a cq block etc.
    I'll let you know about my fabric choice and the size required for my iPad and feel free to contact me if you need any help with figuring out the size of fabric needed for your project.
Please let me know if we give two weeks time to gather all the materials will be enough and start stitching from the first week of March is okay with you all.


Happy stitching!
Anita.

Tuesday, 17 September 2013

Trip down the memory lane...


An old student of mine called a few days back to wish me...We celebrate teacher's day on September 5th here in India.She was talking about my initial stages as a designer (?!) and teacher.I was partly happy to hear her version of 'me' but felt embarrassed most of the time :)

I met a friend on saturday at a coffee shop and we ended up talking about 'me' again,sounds weird isn't it? My friend asked me if I remember when I'd sold my very first design/kit and all those memories flooded back into my thoughts very quickly. I sold my first kit in September 1993 (20 years!) Like any teen-age girl I bought a pair of gold ear-rings with that money,still have the ear-rings with me:)
I didn't have PC,printer etc. back then so I hand painted the design onto the fabric and all the instructions were hand written by me ,wish I'd taken a picture of my first kit.

I came back home ,searched my journal and ended up re-stitching an old peacock design to celebrate.I wish all of you are here with me having a piece of cake ,sharing my little success and happiness...


I just followed my notes without changing much just to remember the past,only addition is beads/spangles .
If I'd stitched this peacock for the first time now I would have reduced the red color.My mother suggested that I should design another peacock for kutch embroidery,make it into a DIY kit or digital download,any suggestions?
Please feel free to comment ..

Happy stitching!
Anita.


Saturday, 9 February 2013

WIP saree...


Hi !
I’d like to share images of my WIP maybe I should say WISP saree with y’all.

                                                  
I've finished the border of the saree and blouse (approximately 10 mts length) and started motifs only recently. To embroider a saree is really difficult sometimes because of the repetition of the pattern with same colour scheme.


It’s a silk saree and the embroidery is with silk threads. Lots more to stitch, so I guess I need some encouraging words right now to complete this saree J.
Have a happy weekend where ever you are!

Happy stitching!
Anita.

Tuesday, 22 May 2012

Remember this paisley?


Hi !
I’m happy that I’ve finished one of my WIP amidst all the chaos at home.
Do you remember this paisley which I’d showed a couple (?) of months back?

                                               
It feels great to strike off one from the list but I wish I stop adding more to the list than striking off…J

Happy stitching!
Anita.

Friday, 20 April 2012

Shisha mirror embroidery


Hi !
I’d like to share the images of my shisha embroidery cover and a WIP which is for my class later this year with y’all.

                                                     
Actually it’s a straight line but it looks wavy because of the wind and my photography skill  J .

                                                                        WIP

Which one do you prefer, monochromatic or multi colour one?

Happy stitching!
Anita.

Thursday, 23 February 2012

Goldwork


Hi !
Today I’d like to show y’all a gold work, Indian version……


I’ve stitched this on my salwar kameez.
I’ve got to go….finish my stitching, only then I’ll have time to e-mail the designs to all the chikan embroidery SAL participants this weekend.
Bye for now…
Happy stitching!
Anita.

Monday, 30 January 2012

Paisley project update


Hi !
Hope y'all enjoyed your weekend.
Let me show you my little progress in  kashmiri embroidery project.
                   
                                             
I'd stitched the main stems with stem stitch using two shades of green,the tiny growth under the paisley is satin stitch with maroon,the thorns are roman stitch and the calyx is satin stitch.

                                       
It looks like the design is almost complete,isn't it?.
I've planned a couple of projects this weekend,the basic preparation is done,so come back to see what it is!
Let me give you a hint-first one is an Indian embroidery and the second is a needlepoint.

Happy stitching!
Anita.

Sunday, 22 January 2012

Cushion cover


Hi!

I'd like to show you a kutch embroidery which I'd stitched for a friend . She is planning to convert this
into a cushion cover.
             
                             
And this is the same design with a different color scheme.I stitched this long time back,thirteen years I think.

                                                 
Which one do y'all prefer?

Happy stitching!

Anita.

Thursday, 19 January 2012

Kasuti embroidery


Hi !

I'd like to thank you all for your support,comments and e-mails .
Today I'd like to show you all a small design which my 4 year old cute niece made me stitch for her.
Can you believe that she chose the design,colors and also the stitches?.
She took one hour to decide the design and colors.She was turning the pages of my sampler book to decide the stitches for another hour,by the time we came to a conclusion her mom' lost all her patience.It was fun watching my niece. And finally we stitched this ......


Kasuti embroidery is  popular in southern India and it's similar to blackwork.I'll write more about this style in detail sometime later.This is one of my young student's Kasuti sampler.


She's done a great job,isn't she?.
I always enjoy teaching little girls and this one has made my day.

When you mail me regarding SAL,please do mention which form of Indian embroidery you'd like to stitch.

Happy stitching!

Anita.

Friday, 13 January 2012

Paisley project


Hi!

I've finished the flowers in paisley project .


The black ones between the two rows of paisley outline is fly stitchI've worked 2 fly stitches facing each other.
The black lines in the flower center is straight stitch.I've worked 3 straight stitches from the same point.
The flower outline is roman stitch variation.

Look what I made .....

                           
Crochet paisleys.Yet to block these lovely motifs.

Enjoy your weekend!
Happy stitching!
Anita.

Sunday, 1 January 2012

Paisley project update


Hi!

WISHING YOU ALL A VERY HAPPY NEW YEAR.

I've worked only a little in Kashmiri paisley project since I was busy with a couple of commissions.


I've used yellow stranded cotton thread for the flower center.
A row of blanket stitch is worked first and the second one is stem stitch.

Happy stitching!

Anita.

Thursday, 29 December 2011

Kashmiri embroidery

Hi!

Kashmiri embroidery is one of the delicate and finest embroidery.The stitches used may be simple but the outcome is beautiful.
There are two types of kashmiri embroidery - sozni (kashida) and aari.
Kashmiri aari is worked with only chain or chain stitch filling.The hook used in this form is slightly bigger than the one which I'd showed y'all in my aari embroidery post.Sozni embroidery is done with crewel needle.
Paisleys and coils are the integral part of many kashmiri embroidery designs.
Kashmiri embroidery is worked with Wool,cotton threads and sometimes silk threads.
Only primary colors(pastel shades) were used earlier,but now lots of colors are used may be because of the client's preference and the availability of colors.
The finest Kashmiri sozni embroidery can be found on pashmina shawls and phirans.
Kashmiri aari can be found on rugs,panels and blouses.


                                                       Kashmiri aari embroidery
                                                   
I'll be showing y'all a Kashmiri sozni(kashida) embroidery step by step.
I've chosen a paisley motif and transfered it to a cotton silk material using a trace paper.
NOTE:Since the sozni designs are small and intricate prick & pounce method doesn't work .Transfer the design  either with a light box or tracing paper.


I've worked 3 lines of paisley in stem stitch using red stranded cotton thread.
I'll be posting my progress here so come back if you are interested in kashmiri embroidery.

Happy stitching!

Anita.

Saturday, 3 December 2011

Kurti - Aari embroidery

I've started a couple of projects this week,will show you all soon.
Today I'm posting images of an aari embroidered kurti.


I've used silk threads and metallic silver beads.

Happy stitching!
Anita.

Sunday, 27 November 2011

Kutch embroidery


Hello everyone,

Hope you all are enjoying your weekend.It's raining outside,am enjoying a cup of hot tea and
before I forget let me show you all a kurti which I'd finished last week.


I'd worked the flowers in elongated kutch embroidery,the leaves in lazy daisy stitch and
the stem in whipped running stitch.

Happy stitching

Anita.

Saturday, 19 November 2011

Aari embroidery part 7

I'd worked the outline of this motif in chain stitch with variegated red thread

 The petal is filled with khiju khiju or vermicelli stitch.


The outline of the petals are done with zig zag chain stitch(over the chain stitch ),  stitched a row of red glass beads between  2 rows of chain in the paisley and flower center is a star shaped golden yellow sequin.


The trellis is chain stitch with variegated red thread and  french knots with variegated yellow thread.
I've got to repeat these motifs  to complete this dress.

Happy stitching!
Anita.

Monday, 14 November 2011

Aari embroidery - part 6


Firstly I'd like thank you all for your support,comments and e-mails.

I've made one straight stitch with 4 strands of green silk thread inside each leaf.


I'd filled some leaves with glass beads.


The small flowers are outlined with chain stitch using variegated red and the flower center is a sequin(flower shape) with a gold color glass bead.


Happy stitching!
Anita.


Wednesday, 9 November 2011

Aari embroidery - part 5

I will be using these silk threads for the salwar project which I'd shown in my previous post.


The basic stitch in aari embroidery is chain stitch.


Here the working thread will always be under the fabric .
To make a chain - Punch the needle from top,wrap the thread over hook,slightly rotate the needle and pull it up.
To start - Make a  waste knot.
To end - Make 2 loose chains, pull the first chain through second one tightly - a knot is made.
While punching, the needle should be perpendicular to the ground fabric otherwise you'll end up pulling warp or weft thread of the fabric.


I've worked all the stems and leaves in chain stitch.

Happy stitching!
Anita.


Monday, 7 November 2011

Aari embroidery - part 4

Today I'm going to show you how to attach the fabric to the aari frame. It's a raw silk fabric for salwar-kameez (green & maroon)


Before attaching I'd transferred the design using white carbon paper .
The design can also be transferred onto the fabric by prick and pounce method .

The fabric is attached to the 2 main bars. Mark the center of the bars as well as the fabric on both sides and pin it up.Use the cotton thread (see aari embroidery part 1) to stitch the first side of the fabric to one of the main bars.


To begin make a knot & to end put 4-5 back stitches on to the white cotton cloth which is attached to the bar.


Then stitch the second side to the other bar and roll it up.


Now insert the stretcher bars and stretch the frame and place the pegs or nails.


Then fold the selvedges, make small darning stitches and pass the same thread through these stitches, pull it tight , tie the thread to the peg/nail.


Now all the 4 sides of the fabric are stretched . Next step is to start stitching .

Happy stitching!
Anita.