Showing posts with label Kantha. Show all posts

Wednesday, 21 May 2014

Sal kantha - final stitches

I was not happy with my color choice for the birds at the bottom of the design. I wanted to change it because the green shade looked kind of washed out and before deciding on a different color I tried another green shade.
                                                    
I'm glad that I tried because am very pleased with result now. It looks a lot better in real than in photograph,thanks to my great photography skills.
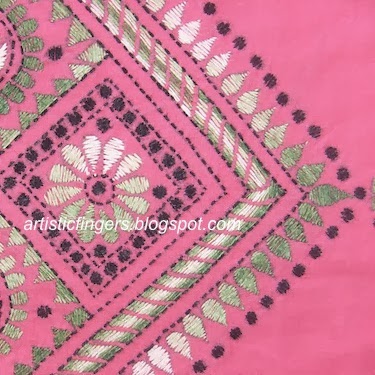
First I had changed the paichano lines of the bird from green shade #239 to green shade #229.It's the same green that we've filled the calyx of the bud. I have filled the gaps between the bejod bands (red kantha stitch bands inside the bird) with diagonal kantha filling stitch lines using 2 strands of the same green.                                                    
The diagonal line is created by a slight forward movement of the kantha stitches.I also changed the angle of the lines I each space just to add a little interest.I also worked a row of kantha stitches between every two diagonal green filling stitches with shade # 926.The eyes are done with kantha filling stitch using black.

Today is the last day of our kantha SAL. I'd like to thank each one of you for participating in this SAL.
A special thanks to the girls who have really stitched along with me, gave suggestions, shared thoughts and ideas.

Did you pick up a new stitch/technique/tip in this SAL? Of all the stitch techniques we have covered in this SAL which one is your most favorite and least favorite stitch? Did you like the slow pace of this SAL or would you have preferred a faster pace? 
 I'd appreciate if you could spend a couple of minutes to leave a feedback.Please feel free to leave both positive and negative feedback.

Happy stitching!
Anita.

Wednesday, 14 May 2014

Sal Kantha - triangle border, dots and flower center

I have filled the triangle borders with kantha stitches using red shd # 047 and the dots are filled with kantha filling stitch using purple shd # 0112 .
                                                      

I have also filled the center of the crown flower and the kantha booti with a couple of kantha stitches using yellow and red. I've managed to fill the tiny gap at the bottom too and I think it looks okay now.
Thank you for leaving your opinion/suggestions about changing the bird color ..both here and via e-mail.A couple of you said that it looks good and I shouldn't change the green.But I think I'll go for a change..But remember that it's okay if you don't have to change the colors, it's after all your project and you are going to live with it so as long as you are happy please go ahead and leave it as it is.

See you all next week with a final update.

Happy stitching!
Anita.

Wednesday, 7 May 2014

Sal kantha - dhaneer sheesh border

I have filled the space between the two 'paichano' borders with an interesting filling stitch called 'dhaneer sheesh'. I don't know about others but for me this one is an interesting filling stitch which seems simple but it's quite difficult to get the movement correct.

Dhaneer sheesh is a filling stitch where equal length of kantha stitches are stitched in rows to form an arrowhead .The speciality of this particular filling is the stitches have either forward or backward movement in each row, interesting,huh?
                                                   
This filling can either be worked as an isolated group of stitches to form one arrowhead or rows of kantha stitches to form an arrowhead band.I prefer to work in continuous group if the border is straight but here since it's a curved one I chose to work individual arrowheads closely to form a band with 2 strands of black floss.
                                               
    
I wanted the arrowheads on both sides to face up so I started working this band from the lower part close to the wheel,completed the border on one side and then started again at the bottom to complete the second side.When I reached the tip I just arranged the stitches at an angle on both sides to get the pointed effect at the tip.Have you noticed a weird gap at the bottom of the band ? I'll have to think how to fill that gap,any suggestions?
                                                 
                                               dhaneer sheesh with 5 kantha stitches
To work an isolated dhaneer sheesh just work it like we did for kantha filling stitch but keep the stitches either forward or backward to the previous one.
                                         
                                                 dhaneer sheesh with 7 kantha stitches
                                  (click on the image to view the placement of the stitches)

To work a band work a row of kantha stitches from right to left ,continue working a second row of stitches from left to right by placing the stitches slightly forward or backward and continue these steps until you complete the pattern.

Now that the band is filled I have some concerns about my choice of the green shade for the birds..I tried this filling with other colors too but it didn't look as good as this..
But I'm not going to change it until I fill the triangles and the dots ,will see how it looks after that...what do you think? Feel free to leave your suggestions in the comment box.

See y'all next Wednesday with an update.

Happy stitching!
Anita.

Wednesday, 30 April 2014

Sal kantha – wheel and borders

I have finished the wheel at the bottom of the design and changed the kantha border lines to paichano border lines because the filling stitch inside the border lines looked a lot better with paichano stitch in my test sampler..more about that next week.
                                                    
The spokes of the wheel is done with paichano stitch using 2 strands of yellow embroidery floss shd # 289.The dots are stitched with kantha filling stitch using 2 strands of black embroidery floss.I have filled the outer black ring area (refer the pattern) of the wheel with 'jod'. A 'jod' is nothing but 2 or more rows of aligned kantha stitches.I have filled the area with 3 rows of kantha stitches but if you are working on a larger pattern then you could work more rows. Next I filled the inner black ring and the empty circle with kantha stitches using 2 strands of black embroidery floss. I chose to fill the inner circle too because I find it too small for another color change but you can do that if you'd want to.
I have also worked a circle of paichano using 2 strands of yellow floss shd # 289 between the two black rings of the wheel.
                                        
The borders are now done with paichano stitch.We have already stitched the borders with kantha stitches.Now all you have to do is whip the kantha stitches using 2 strands of black floss and make it into a paichano.

See y'all next Wednesday with another interesting filling stitch.Please feel free to leave if you have any queries or suggestions in the comment box below.

Happy stitching!

Anita.

Wednesday, 23 April 2014

Sal kantha - crown flower, dot, birds and stem

Time just flies..I can't believe that we are very close to our kantha sal finish line..In just a couple of weeks we will be there :)

The dot above the crown flower is filled with 'kantha filling stitch using 2 strands of red shd # 047.                                                    
The crown flower is filled with 'kantha booti variation' using 2 strands of black and green shd # 239.To work 'kantha booti variation' start stitching from the outer edge of the petal with 2 strands of black just like we did for the kantha booti until you reach the 'v' like slit in the petal and fasten off the black thread.Continue filling the petal from where you'd left earlier with 2 strands of green.                                  
Next I moved on to the stem and birds(!) at the bottom of the pattern.The tear drop shape inside the calyx like thing between the birds(!) is filled with 'kantha filling stitch' using 2 strands of shd # 926.The base of the stem and calyx is filled with kantha stitches using 2 strands of green shd # 269.The outline of the birds are done with paichano using 2 strands of green shd # 239.The beak is completed with 'kantha filling stitch' using red shd # 047.The bands inside the body of the bird is worked with 'bejod' using red shd # 047. A 'bejod' is nothing but rows of non-aligned 'kantha' stitches.

I want to try two different sizes for the bird-eye and see which one looks better for me..will let you all know next week.
See y'all next Wednesday with an update ..

Happy stitching!
Anita.

Wednesday, 16 April 2014

Sal kantha - tara booti,dots,curlicues and stem

I have finished the dots near the crown leaf with kantha filling stitch using 2 strands of black Anchor stranded cotton floss.


I have completed the small flowers above the bud with 'tara booti' using 2 strands of purple floss shd # 112.

To stitch 'tara booti' follow the instructions below:                                         
                         
Step 1: Bring the needle and thread up through the center of the motif, go down at the end of one spoke.                                       
 Step 2: Come up again at the center and go down at the end of the next spoke.                                         
 Repeat steps 1 and 2 until all the spokes are stitched.

                                         
I have also stitched the curlicues at the bottom with kantha stitches using 2 strands of black floss and the stem with kantha stitches using 2 strands of green floss shd #269.

See y'all next Wednesday ..

P.S. Thank y'all again for your wishes and am feeling a lot better now and hope I will be able show some new stuff now that am okay.

Happy stitching!
Anita

Wednesday, 9 April 2014

Sal kantha - bud and stylized calyx

I'd like to thank y'all for your wishes.I'm still not well..hopefully will recover soon..

I have finished the bud and the calyx(!) part of the design.
                                                      
I've completed the bud with kantha filling stitch using 2 strands of Anchor embroidery floss shd # 1205. The calyx is filled with weave or stacked kantha filling stitches using 2 strands of green shd # 229 and the outline is done with kantha stitches using 2 strands of green shd # 239.

This is how I worked the weave kantha filling stitch:
                                        
Step 1: Work kantha stitches from right to left .The stitch should be equal to the squares in the pattern.
                                          
                                   Step 2: Work kantha stitches from left to right as shown.
                                         
                          Step 3: Repeat steps 1 and 2 until the first set of squares are filled.
                                       
Repeat the first two steps to fill the second set of squares.The second set of squares are the ones which lie between the filled squares of the first row.
Repeat the process until the entire pattern is filled.

P.S Thanks Leela and Isabelle for helping me to rename the leaf.I think I'll go with Isabelle's suggestion, sorry Leela.
See y'all next wednesday ..

Happy stitching!
Anita.

Wednesday, 2 April 2014

Sal kantha - few stitches at the top

I have finished the curlicues and leafy thing at the top.
Any suggestions to rename the leafy thing are welcome..my choice is weird ..my brain is not working properly right now and I'm going to put the blame on all the medications I'm taking for flu and viral infection for the past few days. I certainly don't want to stick to it so feel free to leave your suggestions in the comment and let's rename the poor thing.
                                              

I have outlined and filled the infamous leafy thing with irregular kantha stitches using 2 strands of Anchor stranded cotton floss red shd # 047. For beginners – irregular kantha stitches means the length of the stitches and also the distance between 2 stitches vary throughout.
The curlicues are done with kantha stitches using 2 strands of green floss shd # 0246.

Hopefully I'll be okay after some rest and will come back with some interesting filling stitches next wednesday.

Happy stitching!
Anita.

Wednesday, 26 March 2014

Sal kantha - center flower

I have finished the circle around the kantha booti and the petals.
Like I said earlier the flowers and kantha booti are mostly asymmetrical in kantha embroidery.I chose to keep it that way but you can also make it symmetrical if you want.
                                                 

So far I was stitching with only black color and I thought it would be better to throw in some colors.
I have stitched the outline of the circle with whipped running stitch aka paichano using 2 strands of Anchor yellow floss shd # 289. Also I have covered the area between kantha booti and circle with 2 rounds of kantha stitches using the same yellow floss.
I have filled the petals with 2 colors but you could also do this with one color.It looks like satin stitch but it's not.It is kantha stitch filling.I have used 2 strands of purple shd # 112 and variegated pink shd# 1205.

To stitch the petals with kantha filling stitch :-
                                       

    Step 1: Bring the needle and thread up at 'a' and go down at 'b'. Come up near 'b' as shown.
                                        

                                    Step 2: Go down near 'a' and come up as shown.
                                         
                                           Repeat these steps until the petal is covered.
                                          

           This is how the back side looks.I haven't finished the threads at the back yet,sorry.

See y'all next wednesday with an update.

Happy stitching!
Anita.

Wednesday, 19 March 2014

SAL Kantha - spirals,scrolls and kantha booti.

I have finished the spirals and scrolls with kantha stitch using 2 strands of black stranded cotton thread.
                                           

Then I have filled the center motif with a stitch called 'kantha booti' using 2 strands of black floss.
Booti means motif. Please don't fill the motif with very closely placed stitches like satin stitch filling.
Did you notice that this kantha booti in our pattern is not symmetrical ?Asymmetrical are part of many kantha quilts.

I thought some of you would like to have a tutorial for 'kantha booti' so here it is..
Kantha booti is always worked from the outer line towards the center.
                                            
Step 1 : Bring the needle and thread up at 'a', go down at 'b', come up at 'c', go down at 'd' , come up at 'e', go down at 'f', come up at 'g', g down at 'h', come up at 'i' and go down at 'j'

Step 2 : Bring the needle and thread up near 'a', go down near 'b', come up near 'c' and continue working in circle until the entire motif is filled.
                                         
                                         This is how the completed motif should look.

Hint: In case if all the petals but one is filled then you could add a couple of stitches only in that petal to complete this motif.

I will be back next wednesday with an update.
Please feel free to leave a comment if you have any questions or suggestions.

Happy stitching!
Anita.

Wednesday, 12 March 2014

Sal kantha - outer borders

I have finished the outer eye-shaped border with kantha stitches using 2 strands of black stranded cotton thread.
                                           

The next step is to complete the outer triangle border and hook things at the tip of the triangle with kantha stitches using 2 strands of black thread.For this as I said earlier we need to plan a stitch route.
                                           

I started from one end of triangle which is indicated by an arrow in the above image,took a couple of stitches to reach the tip of the triangle, finished the hook thing on both sides ,then worked a couple of stitches on the other slanting side of the triangle and repeated the same plan to complete the entire border.
You don't have to follow the same route.Please go ahead and choose one which you think the best route.The only criteria here is you should be able to complete the border without leaving a longer passing thread.

Will be back next wednesday with some filling stitches :)
Happy stitching!
Anita.

Wednesday, 5 March 2014

Sal kantha - first few stitches


I'd like to share and emphasize a couple of things before taking off.
I'm writing this because some of you have e-mailed me saying that you consider yourself as a beginner and hope these tips helps.These tips are for beginners only so if you are an advanced stitcher then please skip this.
- Transfer the pattern as neat as possible
- Do not use cheap plastic hoops.Please buy a good quality wooden hoop.
- While fixing the fabric in your hoop make sure that the fabric is along the grain which means the fabric threads should be straight and not diagonal in your hoop and it should be stretched drum tight.
- Do not hold the fabric in your hand and try to fix it in the hoop.Instead place the inner ring on your working table or any flat surface,keep your fabric on top of it and then push the outer ring on top of that.Tighten your screw and pull evenly on all sides of the fabric by rotating your hoop until you get the tension right.
- The floss/stranded cotton threads has 6 strands.Mostly we need only 2 strands of thread for kantha embroidery.You have to separate the strands and join them again to avoid twists while stitching.
- I prefer to stitch with 16'' length thread.You could also measure the thread from your finger tips to elbow and cut it off which will be 16'' length approximately.
- To avoid puckering of fabric do not pull the stitches tightly.

Come on in…. Let's start stitching.

I have stitched the inner line of the eye-shape with 'running stitch' which called as 'kantha stitch' in kantha embroidery using 2 strands of black Anchor stranded cotton thread.
The tutorial for running stitch is here
                                               

The stitch length and the distance between two kantha stitches should be less than ¼'' .
Stitch route is very important in any surface embroidery especially in kantha embroidery .I started to stitch at one tip of the eye-shape, worked around and ended it close to the starting point.

If you choose to work the kantha stitch by stabbing method ie going down and coming out of the fabric by keeping the needle at 90 degrees then it's fine but if you choose to do this by sewing method then my suggestion would be not to pick more than 2 stitches at a time.

If you have any questions please feel free to leave a comment here.

P.S. Don't forget to come back next wednesday for the kantha update.

Happy stitching!
Anita.

Wednesday, 26 February 2014

SAL Kantha - choosing a fabric,thread and transfer technique

I've decided to write about this sal only on Wednesdays so don't forget to check my wednesday posts every week from now on until we finish this project.
I've sent the pattern to all the participants except Julie. Please let me know if any of you had signed up but didn't receive the pattern. Julie – I couldn't find your e-mail id,so please do leave a comment with your id or send me an e-mail.
                                                  
                                      
Firstly I had to choose between linen,close weave high count cotton and silk fabric.After serious thinking I decided to go with silk fabric.The silk fabric has to be medium weight,high count with less sheen. Tusser silk has all the above said qualities and l had it in my stash already.I chose a light gold colored tusser silk, cut it to the required size, finished the edges to prevent fraying, rinsed it with mild soap, dried and pressed it.If you are a beginner then you have to be extra careful and cut the fabric along the grain.

The next step was to transfer the pattern onto the fabric.I reduced the pattern at 90% and used a 2H pencil to transfer the pattern,then brushed it thoroughly to remove the lead dust in case if there was any and pressed the fabric again.The pencil mark is darker than it appears in the photo

I had decided to use only stranded cotton threads otherwise known as embroidery floss in some countries way before choosing the pattern and fabric.I have almost full range of Anchor threads but many of the DMC shades are missing in my collection.So I'll be using only Anchor threads and if you want to use DMC floss or any other threads please go ahead.I'm afraid that I can't give the all the shade numbers as of now because I may not like a color and change it as I go.But I'll tell you the shade nos. that I've used after finishing an element of the design in each post.So if you want to work this pattern exactly as I do then please be patient until I finish an element and post it here.

Do you have any questions or suggestions? Please feel free to leave a comment here.

Happy stitching!
Anita.


Tuesday, 11 February 2014

Kantha embroidery and Sal FAQ

Kantha embroidery is one of the popular form of Indian embroidery techniques.It is widely practiced in West Bengal.Today it is also one of the popular techniques in Bangladesh which was a part of Bengal,India before the independence.I would say that kantha embroidery is one of the finest example of rich folk art.The kantha quilts were exported to Europe in large quantities during late 1500's - early 1600's.
The kantha embroidery has both Hindu and Muslim influence which is evident from the motifs used in this form.
                                                   
                                               
*The above image is a part of a pattern from my collection of a sampler worked by an unknown kantha embroiderer.

Kantha quilts called 'Lep' are made from old sarees. To make a 'leo' many sarees are laid together, running stitches with white thread are used to join and strengthen the sarees. The base fabric of the quilt is always a white saree (both cotton and silk) , decorative motifs are drawn and embroidered using black,red,green,yellow and blue threads.To get a rippled effect the entire quilt is covered by darning/running stitches with white threads.
                                              

Apart from quilts there are also other varieties of kantha. The most popular one is 'sujanis' which is a thin spread used during religious festivals and marriages.The mythological stories are depicted in these sujanis. Lord Krishna and the lotus dominates the sujanis. 'Rumal' kantha is a hand kerchief with a floral border and a corner motif. 'Bayton' kantha is a piece of embroidered cloth used to cover books. 'Arshalita' kantha is a narrow strip of embroidered cloth with broad borders used to hold accessories like mirrors,combs etc. 'Arshalita' kantha is an envelope shaped wallet .

The common motifs used in Kantha embroidery are lotus,fish,peacock,bull,tiger,pipal leaf,ship,snake,elephant.Also vines,flowers,human figures,geometric motifs are widely used.

Kantha Embroidery Sal FAQ
I have received few e-mails with some queries about this sal. I thought it would be better if I answer them here so that it'll be helpful for others with the same queries and also on a personal note it saves me some time.
  • To participate in this sal you have to sign up by either leaving a comment with your e-mail id or e-mail me at artisticfingers2012@gmail.com . If you'd already left a comment in the previous post with your e-mail id that's okay too.
  • You don't have to buy a kit or pattern from me to participate in this sal. It is totally free of cost.
  • I'll start sending the pattern via e-mail to all the participants this week end.
  • It's suitable for all level embroiderers.
  • You will need a close weave cotton or silk fabric,stranded cotton threads/embroidery floss,hoop or frame,mechanical pencil and light box if needed,scissors,crewel needles no.7 or 8.
  • Regarding the size of the fabric – you can decide it after you receive the pattern by yourself.
    I'll be making an iPad cover out of this project so I will be choosing a size that suits my iPad.
    But you could also stitch this on a pillow/cushion cover,dress,frame it,use it in a cq block etc.
    I'll let you know about my fabric choice and the size required for my iPad and feel free to contact me if you need any help with figuring out the size of fabric needed for your project.
Please let me know if we give two weeks time to gather all the materials will be enough and start stitching from the first week of March is okay with you all.


Happy stitching!
Anita.